On flat ground, a loaded cat hiking backpack can feel steady. The first downhill step can reveal a different story. The pack swings away from the wearer, the floor tilts, or a shoulder strap slips through its adjuster. For pet brands developing a trail model, these are reasons to evaluate the fully assembled pack in motion before approving a sample. The same checks can help buyers judge whether a design suits the routes they have in mind.
1. What Makes a Cat Hiking Backpack Suitable for the Trail?
Match the Carrier to the Route
Start with three questions. Does the loaded pack stay close to the wearer during movement? Does the floor stay supported when the load shifts? Which ventilation openings remain clear when the pack is worn with its pockets filled?
A cat carrier for hiking should be evaluated in the conditions it was designed for. The most useful first check depends on the route and how the pack will be used.
| Intended use | What to check first |
|---|---|
| Short, level walks | Whether the base stays level when lifted and the main opening is easy to operate after setting the pack down |
| Routes with steps and descents | Whether the pack swings, the shoulder straps slip, or the floor tilts when the load moves off center |
| Routes where a weather cover may be used | Which vents remain exposed with the cover fitted, the pockets filled, and the pack against the wearer’s back |
For a product range that also includes carriers for vet visits or everyday transport, compare the formats before setting the trail model’s design brief: Cat Backpack Carrier vs. Traditional Cat Carrier
2. How Should a Hiking Cat Backpack Fit the Wearer?
Fit the Harness to the Wearer’s Torso
Try the loaded prototype on wearers with different torso lengths. Check where the shoulder straps sit, how far the chest strap can move, and whether the pack rubs or shifts during a full stride. If the design uses a hip belt to transfer load, check where it sits on the wearer and whether the back panel and harness support that transfer.

Check What Happens When the Load Moves
Use an inert test load and repeat the same turns, steps, and descents with the weight centered, offset to one side, and shifted toward the rear. Keep the total load and route consistent. Mark the starting positions of the webbing at each adjuster and record the pack from the side and rear. A shift in the webbing mark indicates strap slip. If the marks hold and the pack still rotates, look at the harness fit, anchor placement, and how far the load sits from the wearer.
Look at How Features Work Together
Travel Cat’s Navigator lists adjustable chest and waist straps, mesh on three sides, and a hydration pocket. For a brand developing a similar layout, the useful question is what changes once that pocket is filled. Compare how the pack sits and which mesh panels remain clear with the pocket empty and loaded.
3. How Much Usable Space and Base Support Does the Cat Need?
Measure the Interior With All Components Installed
Fit the liner, floor pad, and support board before measuring. Record the clear floor length and width, the width at the narrowest point, and the available height where the shell curves inward. If the entrance tapers, measure the clear opening separately. These dimensions give brands a practical basis for evaluating the cat’s space to stand, turn, and rest.

Separate Animal Fit From Rated Load
Give usable dimensions and verified load separate fields in the specification. Then check the floor with the test load centered, to one side, and near the rear edge. Record how far the base deflects, whether it recovers after unloading, and whether the insert shifts inside its sleeve. If one edge drops under an offset load, inspect the support board and the sleeve that holds it before deciding which part to revise.
4. How Does Ventilation Change When the Backpack Is Worn?
Map the Openings With Pockets Filled and Covers Fitted
An adventure cat backpack may have several visible mesh panels. In use, the wearer’s jacket can cover a rear opening, a bottle can sit against a side panel, and a weather flap can cover part of the front. Fit the pack as it will be worn, fill the pockets, and photograph the openings that remain exposed in each intended configuration.

Evaluate Weather Protection and Ventilation Together
Mark vent locations and cover positions on the technical drawing so the sample room can reproduce the setup. Mesh area helps compare patterns. If the brand plans to make a claim about airflow or internal temperature, measure that performance separately and document the ambient conditions, test duration, pack loading, and cover position.
5. How Can Trail Openings Stay Secure and Easy to Use?
Inspect Zipper Ends and Mesh Seams Under Load
Check zipper ends, tight corners, and junctions where mesh meets binding. Inspect those same points with the pack resting on its base, suspended from the harness, and carrying an offset load. Record any changes in gap size, slider position, or seam shape. Photograph the location so the pattern or sewing team can reproduce the issue.

Rehearse Setting the Pack Down and Opening It
A cat carrier for hiking may be taken off and set down on uneven ground. Using an inert load, have the tester remove the pack, set it down, partially open the main panel, and close it again. Check whether the pack stays upright, the tester can control the opening, and both zipper pulls return to their intended closing position. Repeat with gloves if the product is designed for cold-weather use.
6. Which Materials and Construction Details Matter on the Trail?
Follow the Load From the Base to the Shoulder Straps
On a hiking cat backpack, trace how the weight moves from the floor through the body panels to the webbing and shoulder anchors. Inspect the entire anchor assembly, including the backing fabric, seam allowance, reinforcement stitching, and connection to the surrounding panel. A drawing that identifies these components gives the sample and production teams a shared reference when an anchor moves or a seam distorts under load.
Specify High-Wear Zones and Removable Parts
Focus on areas that see repeated contact or handling. Base corners touch the ground, mesh edges flex at their bindings, and the floor pad comes out for cleaning. Verify that removable parts can be reinstalled in the correct orientation and stay seated when the pack is lifted. Before approving added reinforcement, check its effect on finished pack weight and usable interior space.
7. What OEM Quality Checks Should a Cat Hiking Backpack Pass?
Agree on the test conditions and acceptance limits before sample approval. Use inert loads for structural and movement checks. Tailor the following checklist to the intended load, size range, and construction.
| Check | Sample setup | What to record |
|---|---|---|
| Base support | Install the liner and support board, then apply centered and offset loads | Floor deflection, recovery after unloading, and insert movement |
| Strap retention and pack movement | Mark the webbing at each adjuster, then repeat the agreed movement sequence | Webbing displacement, pack rotation, and changes around the anchors |
| Closure durability | Cycle the zippers under agreed conditions, then inspect the assembled pack under load | Slider travel, seam or zipper tape distortion, and gaps at corners or ends |
| Ventilation openings in use | Fit the loaded pack on the wearer, fill the pockets, and position each supplied cover | Exposed openings in each configuration, with photos from the same angles |
| Set-down stability | Lower the loaded pack onto the agreed surface and partially operate the opening | Base contact, tipping or rocking, and control of the opening |
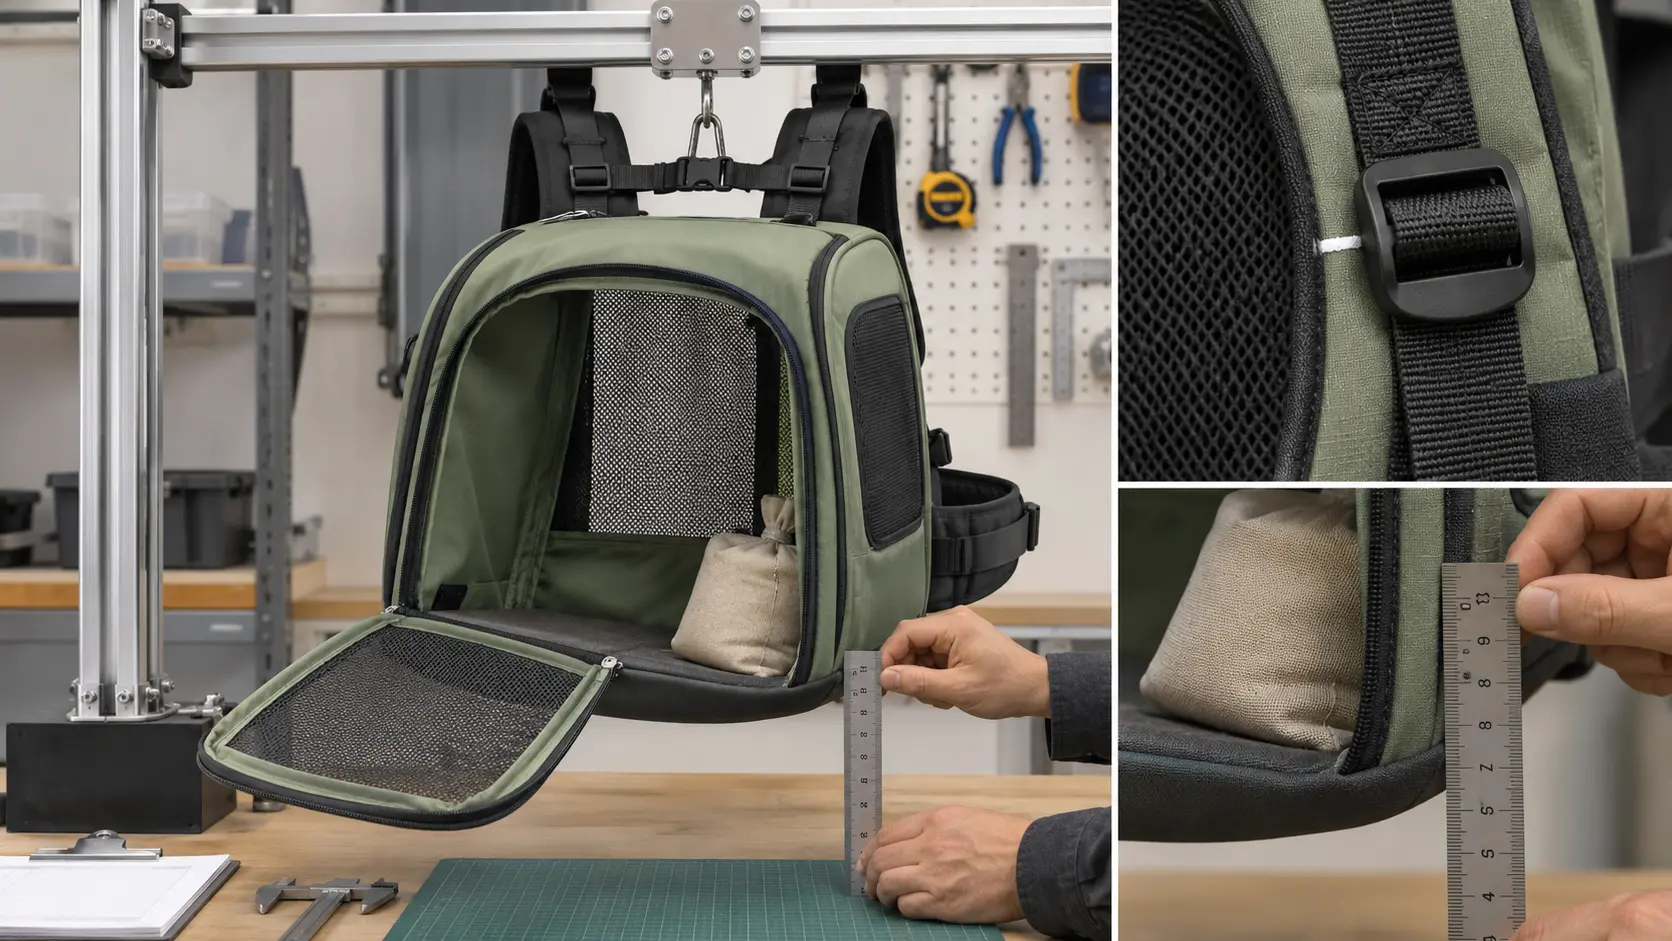
For strap retention, for example, mark the webbing at the adjuster, complete the agreed sequence, and compare the measured displacement with the signed specification. If the supplier proposes a different buckle or webbing, repeat the test with that combination under the same conditions.
8. How Do Brands Carry Sample Approval Into Bulk Production?
Define Use Conditions in the Tech Pack
Include the target cat size range, intended routes, expected carried load, usable interior dimensions, and finished pack weight. Add details that are difficult to judge from photos, including the base insert specification, shoulder anchor placement, adjustment range, and the openings that must remain clear in each cover configuration.
Link the Approved Sample to Production Inspection
Keep the approved sample with the current drawings, bill of materials, and inspection checklist. At first-piece inspection, confirm that the factory has reproduced the signed construction. During bulk inspection, check agreed dimensions, assembly details, and closure operation on sampled units. If the mesh, zipper, webbing, or support board changes, repeat the checks affected by the substitution before approving it.
As an experienced custom pet bag manufacturer, Aimazing Bag works with pet brands, wholesalers, and distributors on OEM/ODM development from sampling to bulk production. If you are developing a trail model, share the intended routes, target cat size range, and any fit or performance issue you want the next sample to address.
9. Cat Hiking Backpack FAQ
Does a Higher Weight Limit Mean More Usable Space?
Weight capacity and interior space measure different things. Compare the verified load with the clear floor dimensions, usable height, and entry size measured with the liner and base installed.
Does a Hip Belt Help on Downhill Sections?
It can help steady the pack when the belt fits and the pack structure supports load transfer. Compare the same loaded prototype on the same descent with the belt fastened and unfastened. Observe pack movement and record any strap slip.
How Can Buyers Check Ventilation With a Rain Cover Fitted?
Inspect the pack from the front and both sides while it is worn, with the pockets filled and the cover in its intended position. Check which openings remain exposed. For a product claim about airflow or temperature, ask for the results and test conditions for that configuration.
Which Checks Should Be Repeated After a Material Change?
Repeat the checks tied to the part that changed. A different support board calls for a new deflection and recovery check. A different zipper calls for cycling and a loaded gap inspection. A change in mesh can affect the sewn joint and airflow, so assess it in the assembled pack.
If you were approving a prototype for steep trails, which result would you want to see first: how far the pack swings on a descent, or how far the floor tilts when the load shifts?